Friday, January 2, 2015

My Desk: Before and After

My desk space has been a work in progress since we moved into this house 3 years ago. 
I think this is the 4th desk that I have attempted to make work and I think I may have finally found the right fit.

This is an old Cypress board that was in my grandfather's garage for at least 75 years. It is from the old water towers that would line the railroad tracks.  

Story has it that he was going to use it in a boat.
Who knows. 
Not me,  that is for sure.

It is a very rough cut slab that is 12 feet by 3 feet.
A hefty chunk of wood.

My husband and I moved this baby from Minnesota to Virginia in the middle of the winter. Our trailer was only 10 feet long so it hung out a little bit.

It sat in our garage for 4 years while I tried to figure out what to use it for.  Birds made a nest on it.

Then it made the trip from Culpeper, Virginia to Asheville, North Carolina via moving truck where is sat in my basement for another 3 years.

It is a huge piece of wood.   I had a few woodworkers suggest cutting it.

That was not going to happen.

After a lot of thought I decided to head to Habitat for Humanity to see if I could find a base for the desk. I figured that built in cabinets that were made for desks would work great. Thankfully I was able to find two cabinets that were exactly alike and were file cabinets with drawers.

Perfect size, perfect height.

More importantly perfect price...$15.00 each! Score!

As a trial run to see if it would work I placed the top on the base and used it for about a month.
It was exactly what I wanted.

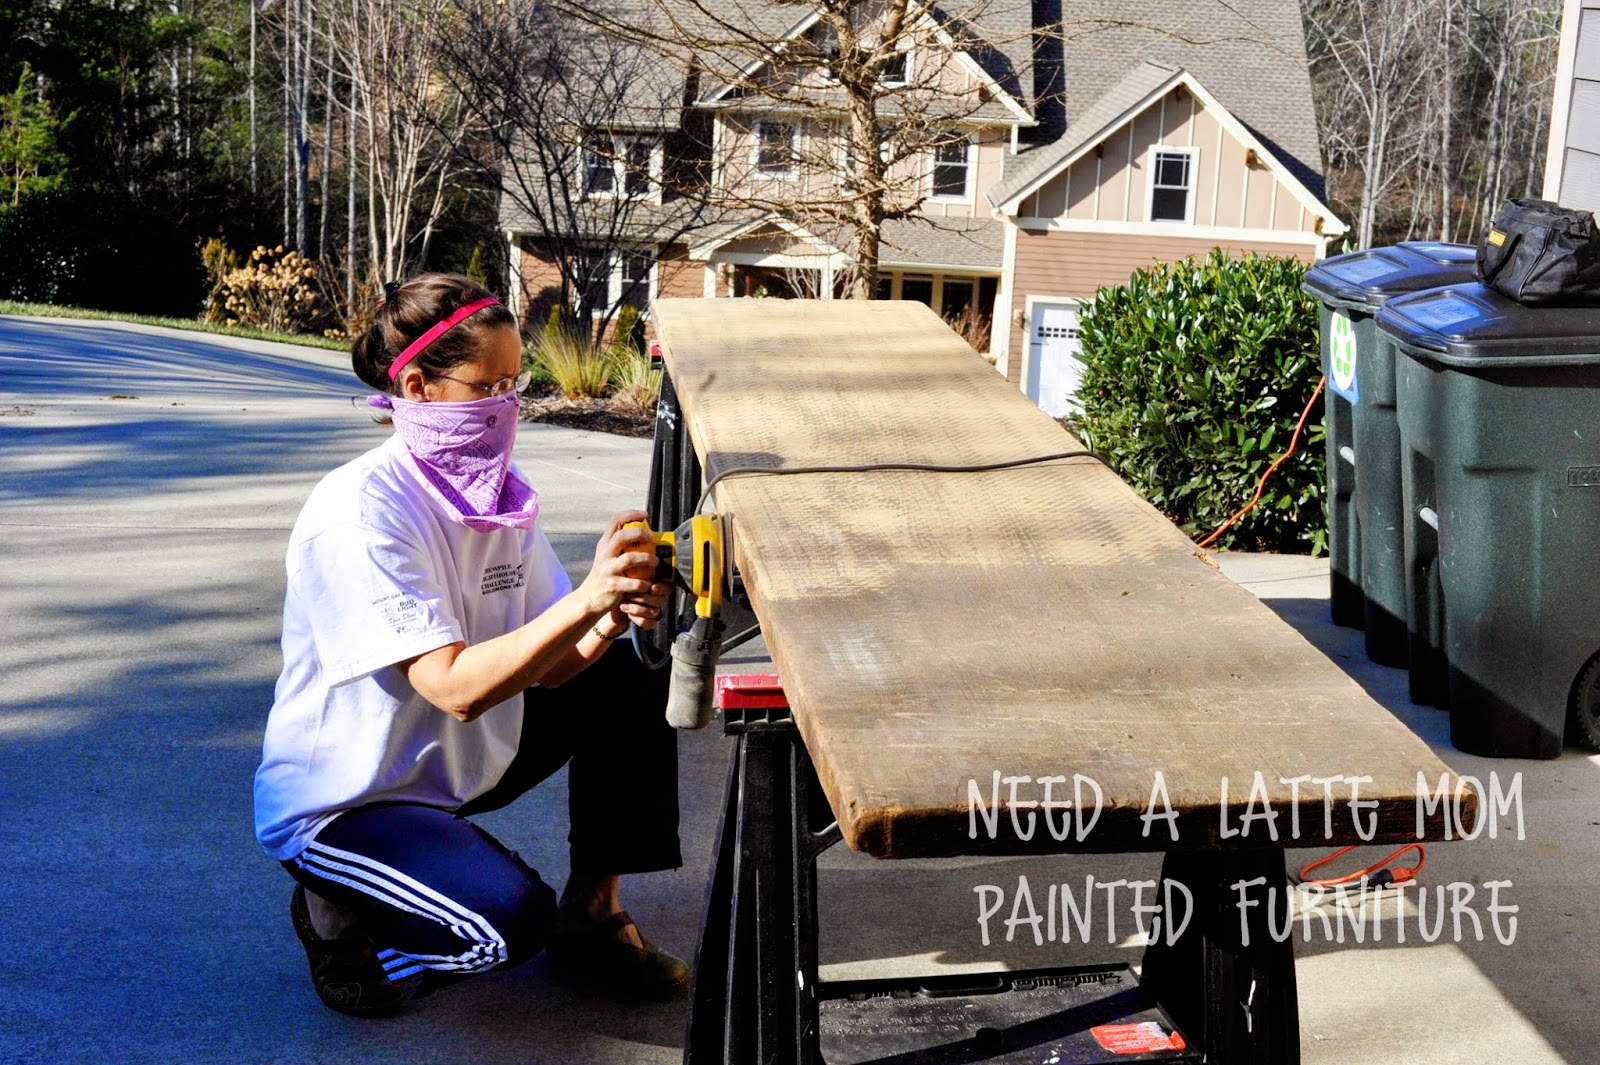
After a month of using it and getting a lot of slivers it was time to sand it down.

I ran lots of different ideas of finishes through my mind while I was sanding.
Sand it all the way down?
Just knock the big stuff off and keep the character?
Stain, no stain.
Sand one side, leave the other.

By the time I had sanded for 5 hours.

And used many pads of 60 grit, 120 grit, 220 grit sand paper I ended up sanding it smooth.


Sanding can be kind of mesmerizing when you start to see the grain coming though.

Unfortunately Cypress wood does not have that pretty of a grain. But the feel of such smooth texture kept me going.


By the time I was done sanding I had decided to stain it Honey by MinWax.

I figured it would be a nice light color, nothing too dark.

And I had a whole quart of it in my cabinet. 


Like the picture above? There was a LOT of sawdust generated.

Below Martha is flashing the world.


No final picture of the after the sanding stage. Sorry.

When I was done sanding and wiping it down with mineral spirits to make sure the surface was really clean I was ready to stain.

Remember I said that I had an entire quart of Honey stain in the garage.

I don't remember when I bought the stain and I was quite surprised that I had an entire quart but did not question it.

I should have.

I should have tested it on a small piece of wood.

I should have listened to myself when I thought...hmmmm, seems kinda dark?

I should have and I didn't.

I was being impatient because I wanted to see it done.

After I made the first swipe of stain across the freshly sanded board did I then remember....This is a mixture of stain I made from Mahogany, Ebony, Honey and some other color I had left over.

This IS NOT going to be a light color.

Oh, well.


A lot more color that I had planned.

But it works OK.


And the finish is very smooth.

No more slivers.


Thursday, January 1, 2015

Wrought Iron Chalk Paint by Maison Blanche (Asheville Furniture Painter)

Wrought Iron paint by Maison Blanche is really a nice color to work with.
It gives you the dark black color without having to add tint to make it really black.

If you have used other black chalk paints you know what I am referring to.

Annie Sloan's Graphite is a dark gray, almost black. Which is fine if you want to finish with a dark wax to get the darker color and a little color variation in your finish. I finished a maple cabinet in my kitchen with Graphite and dark wax and you can check it out here.  I really like the finish on this piece but it does require a little more elbow grease.

With the Wrought Iron I am able to use clear wax.

Neither are wrong. Both give a great look.


Because I used a flash in these pictures the light has bounced off the surface giving it an ashy appearance. In person these color variations do not exist.


I was hesitant to use these photos because of the light reflection and it does make it a little unattractive but oh well,  Here they are.

Sunday, December 28, 2014

Tuxedo Buffet


I was strolling through my photos and I stumbled across the Tuxedo Buffet.

I had finished this piece about a year ago and never posted the pictures.  Whoops.

Just love how this piece turned out.  The buffet was in really great condition and could have been left as is but what fun is that?

A little Graphite by Annie Sloan with clear wax.


Friday, September 5, 2014

Bad Mom Award

So school started, oh...about 2 weeks ago and I am now just getting around to posting pictures.

Slacker.

Thing is I can hardly look at my desk chair without cringing in pain and the thought of sitting in it to edit photos was not what I wanted to do.

That and the fact that my kids were hardly cooperative in my taking their pictures.

 Sam has taken on the persona of a twit when it comes to having his picture taken. Full definition of a twit is a silly annoying person and that about sums up a 14 year old boy.

10th Grade. 

Drivers Ed. 

A girlfriend. 

Eats and sleeps all the time.

And mumbles. 

Sigh.


 Sophia of course is always ready to have her picture taken.

Starting her senior year. Hard to believe that is happening already.

I know this year is going to fly by and then she will be off to college.

Is it wrong that I have plans for her bedroom? Just kidding sweetheart, I will never change it. 

Maybe. Depends. Just a little.


 Carter started middle school this year.

A new building.

Harder classes and more work.

He is up to the task.

And growing out of everything. I know by the middle of the school year I will be replacing the uniform.


Go get'em guys.

I know you will shine!

Sunday, May 25, 2014

Desk in Country Grey and Duck Egg Blue { Before and After}


My latest thrift store find is this beat up mahogany desk that had seen better days.
The top was pretty scratched up, there was mold growing on the sides and what is an old barn fresh piece of furniture without a few mouse droppings.
Everything that was wrong with it could easily be fixed.

I first sanded the top with my orbital sander and started with 80 grit sand paper.
Then 120 grit
Finished with 220.
The top was smooth and perfect.
 I love being able to sand down a piece of furniture and see the original wood come through.
 I wiped it down reeeeaaaal  gooooood.
No I did not  use a tack cloth, I am bad about that.
But I did use my leaf blower to blow all the dust off.

I then stained the top with a mahogany stain.
When I am staining I like to use an old t-shirt that has been cut up and folded, I feel like I have better control over how it is applied.
I then use another piece of t-shirt to wipe of the excess. This is done several times to get any stain that has beaded up.
This is an important step because if you do not remove the excess it will never completely dry and remain tacky.
I know this because I have made the mistake.
It will eventually dry I told myself.
Never happened.

After it has completely dried, about 24 hours, I bring it into the house to apply the top clear coat.
By bringing it into the house I do not have to worry about Betty/Martha hair floating onto my perfect finish.

I have started using General Finishes Gel Top Coat and I absolutely LOVE IT!
You apply it with a rag and wipe it on. EASY PEASY with no dripping, bubbles, streaks nothing.
Just love it.


Once I have finished applying all the top coats I then start on the body of the piece.
I painted this one with Country Grey by Annie Sloan Chalk Paint on the main porting of the piece and used Duck Egg Blue on the drawers.
Sanded the paint by hand using 150 grit sanding block and finished it off with clear wax.


The refinished top makes it look like a brand new piece of furniture.


I was able to use the original hardware. 
Always a bonus.


And now it is finished and ready for a new home.